It online Exam

Monday, 24 July 2017

Lesson No. 1 Web Publishing - CSS


What is CSS?
  • CSS stands for Cascading Style Sheets
  • CSS describes how HTML elements are to be displayed on screen, paper, or in other media
  • CSS saves a lot of work. It can control the layout of multiple web pages all at once
  • CSS is used to define styles for your web pages, including the design, layout and variations in display for different devices and screen sizes. 
  • External stylesheets are stored in CSS files


CSS Syntax

A CSS rule-set consists of a selector and a declaration block:
CSS rule syntax


  • The selector points to the HTML element you want to style.
  • The declaration block contains one or more declarations separated by semicolons.
  • Each declaration includes a CSS property name and a value, separated by a colon.
  • A CSS declaration always ends with a semicolon, and declaration blocks are surrounded by curly braces.

Example:
p {
    color
: red;
    text-align
: center;
}


Three Ways to Insert CSS
There are three ways of inserting a style sheet:
  • External style sheet
  • Internal style sheet
  • Inline style


1.  External Style Sheet

With an external style sheet, you can change the look of an entire website by changing just one file!
Each page must include a reference to the external style sheet file inside the <link> element. The <link> element goes inside the <head> section:
An external style sheet can be written in any text editor. The file should not contain any html tags. The style sheet file must be saved with a .css extension.
Example:
<head>
<link rel="stylesheet" type="text/css" href="mystyle.css">
</head>

Here is how the "myStyle.css" looks:
body {
    background-color
: lightblue;
}

h1
{
    color
: navy;
    margin-left
: 20px;
}


Note: Do not add a space between the property value and the unit (such as margin-left:20 px;). The correct way is: margin-left:20px;


2.  Internal Style Sheet

An internal style sheet may be used if one single page has a unique style.
Internal styles are defined within the <style> element, inside the <head> section of an HTML page:
Example:
<head>
        <style>
        body
{
                background-color
: linen;
        }

        h1
{
                color
: maroon;
                margin-left
: 40px;
        }
        </style>
</head>

3.  Inline Styles

An inline style may be used to apply a unique style for a single element.
To use inline styles, add the style attribute to the relevant element. The style attribute can contain any CSS property.
The example below shows how to change the color and the left margin of a <h1> element:
Example:
<h1 style="color:blue;margin-left:30px;">This is a heading.</h1>

Note: If some properties have been defined for the same selector (element) in different style sheets, the value from the last read style sheet will be used. 


CSS Selectors

CSS selectors are used to "find" (or select) HTML elements based on their element name, id, class, attribute, and more.

The element Selector

The element selector selects elements based on the element name.
Example:

p {
    text-align
: center;
    color
: red;
}

The id Selector

·         The id selector uses the id attribute of an HTML element to select a specific element.
·         The id of an element should be unique within a page, so the id selector is used to select one unique element!
·         To select an element with a specific id, write a hash (#) character, followed by the id of the element.
Example:
#para1 {
    text-align
: center;
    color
: red;
}
<p id="para1">                            
   .....................................................
    ...................................................
</p>


The class Selector

·         The class selector selects elements with a specific class attribute.
·         To select elements with a specific class, write a period (.) character, followed by the name of the class.

Example:
.center  {
    text-align
: center;
    color
: red;
}

Grouping Selectors

If you have elements with the same style definitions, it will be better to group the selectors, to minimize the code.
To group selectors, separate each selector with a comma.
Example:
h1, h2, p {
    text-align
: center;
    color
: red;
}

Important CSS properties
Color - The color property specifies the color of text.
Example:
body {
  color: red;
}


h1 
{
  color: #00ff00;
}

Background-image - The background-image property sets one or more background images for an element. By default, a background-image is placed at the top-left corner of an element, and repeated both vertically and horizontally.
Example:

body {
  background-image: url("img_tree.gif"), url("paper.gif");
  background-color: #cccccc;

}

Background-color - Set the background color for a page:
Example:

body {background-color: coral;}

Background - Set different background properties in one declaration for background color, image, position, size, attachment, etc.
Example:

body {
  background: lightblue url("img_tree.gif") no-repeat fixed center;
}

Border - The border property is a shorthand property for:

Example:

h1 {
  border: 5px solid red;
}


h2 
{
  border: 4px dotted blue;
}

Text-align - The text-align property specifies the horizontal alignment of text in an element.
Values are   left|right|center|justify|initial|inherit;
Example:

div {
  text-align: center;
}

Text-decoration - The text-decoration property specifies the decoration added to text, and is a shorthand property for:
  • text-decoration-line (required)
  • text-decoration-color
  • text-decoration-style

Example:

h1 {
  text-decoration: overline;
}


h2 
{
  text-decoration: line-through;
}


h3 
{
  text-decoration: underline;
}


h4 
{
  text-decoration: underline overline;
}

Font - The font property is a shorthand property for:
The font-size and font-family values are required. If one of the other values is missing, their default value are used.
Example:

{
  font: italic bold 12px/30px Georgia, serif;
}

Font-size - The font-size property sets the size of a font.
div {
  font-size: 15px;
}

Font-family - The font-family property specifies the font for an element.
The font-family property can hold several font names as a "fallback" system. If the browser does not support the first font, it tries the next font.
Example:

H2 {
  font-family: "Times New Roman", Times, serif;
}

Font-style - The font-style property specifies the font style for a text. Values are normal|italic|oblique|initial|inherit
Example:

{
  font-style: italic;
}

font-weight - The font-weight property sets how thick or thin characters in text should be displayed.
The values are - normal|bold|bolder|lighter|number|initial|inherit;
Example:

{
  font-weight: bold;
}

letter-spacing - The letter-spacing property increases or decreases the space between characters in a text. The values are normal|length|initial|inherit;
Example:

h2 {
  letter-spacing: 2px;
}


Float - The float property specifies how an element should float.
Example:

img  {
  float: right;
}

Margin - The margin property sets the margins for an element, and is a shorthand property for the following properties:

Example:

{
  margin: 35px;
}
p {
     margin: 10px 5px 15px 20px;
}

Padding - An element's padding is the space between its content and its border.
The padding property is a shorthand property for:
·         Example:

Example:

{
  padding: 35px;
}

z-index - The z-index property specifies the stack order of an element.
An element with greater stack order is always in front of an element with a lower stack order.
Example:

img {
  position: absolute;
  left: 0px;

  top: 0px;

  z-index: -1;

}

Position - The position property specifies the type of positioning method used for an element (static, relative, absolute, fixed, or sticky).
Example:

 h2 {
  position: absolute;
  left: 100px;

  top: 150px;

}

Value
Description
static
Default value. Elements render in order, as they appear in the document flow
absolute
The element is positioned relative to its first positioned (not static) ancestor element
fixed
The element is positioned relative to the browser window
relative
The element is positioned relative to its normal position, so "left:20px" adds 20 pixels to the element's LEFT position
sticky
The element is positioned based on the user's scroll position
A sticky element toggles between relative and fixed, depending on the scroll position. It is positioned relative until a given offset position is met in the viewport - then it "sticks" in place (like position:fixed).
Note: Not supported in IE/Edge 15 or earlier. Supported in Safari from version 6.1 with a -webkit- prefix.
initial
Sets this property to its default value. 
inherit
Inherits this property from its parent element.


Top - The top property affects the vertical position of a positioned element. This property has no effect on non-positioned elements.
Example:

 div {
  position: absolute;

  top: 50px;

  border: 3px solid green;

}


Friday, 7 July 2017

Lesson No. 1 Web Publishing - Cross Browser Testing

Chapter No. 1 Web Publishing

Cross Browser Testing

Introduction
With wide range of web browsers available, end users using different web browsers to access your web site/applications, it has now become crucial to test web site/applications on multiple browsers. On different browsers, client components like HTML, JavaScript, AJAX requests, Applets, Flash, etc. may behave differently.

Testing your website on different browsers is knows as Cross Browser Testing.
Cross Browser Testing is a process to test web applications across multiple browsers.
It involves checking compatibility of your application across multiple web browsers and ensures that your web application works correctly across different web browsers.
It involves testing both the client side and server side behavior of your Web application when it is accessed using different Web Browsers.
It shows limitation of the web site and functional features.
Some Popular Browsers:


In every browser and platform the website will look and work differently.
Every web browser comes with variations and differences in the way a web page is displayed and works.


Examples:

1.  <bgsound> tag is only supported by Internet Explorer and not by Netscape Navigator, Chrome, Firefox, Opera, etc..
2.  Broken image - an image in a web page whose path is not found or path is wrong or file name is given is wrong. Internet Explorer shows broken images with a red color sign along with alternative text. In Netscape Navigator, it shows 3 color dots with alternative text.
3. <hr> tag Horizontal rule - The appearance is different in browsers. In Internet Explorer it shows 3D effect, whereas in Netscape Navigator it show rule (line)  in regular manner.
4. bordercolorlight and bordercolordark - attributes of <table> tag are supported in Internet Explorer but not supported in Netscape Navigator.
5. bgproperties=fixed - This attribute used in <body> tag makes background image water marked in Internet Explorer, but moves with text in Netscape Navigator.
6. Outset Border - Outset border style given to paragraph tag is shown in Internet Explorer and not in Netscape navigator.
7. <blink> tag is not supported in Internet Explorer and other browsers which blinks the text, but supported in Netscape Navigator.

Lesson No. 1 Web Publishing - Creation of Web Content using Indian Languages

Chapter No. 1 Web Publishing

Creation of Web Content using Indian Languages

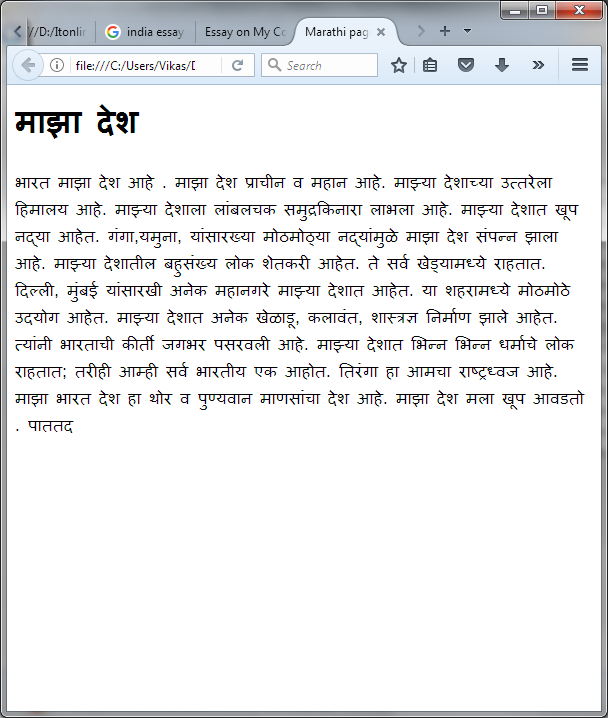
By using Unicode and Indian language fonts Arial Unicode MS and Mangal
About Unicode:
Unicode is a computing industry standard for the consistent encoding, representation, and handling of text expressed in most of the world's writing systems.
It is a standard character set encoding developed and maintained by The Unicode Consortium.
It can support over one million characters.
It supports all characters from all scripts, as well as many symbols.
Unicode also knows as UTF-8 (Unicode Transformation Format-8) or the Universal Alphabet.
Today all the web browser and operating systems includes Unicode support.
 Steps for language settings in Windows
1.  Go to Control Panel
2.  Click on Clock, Language and Regional.
3.  Click on Change Keyboards or Other Input Methods options.
4.  In "Keyboards and Languages" box click on Change keyboards option.
5.  In the "Text Services and Input Languages" window, in the General tab, click on Add button.
6.  In the Add Input Language window,  Search for your required indian language and click the plus sign to open.
7.  Now click the plus sign to open Keyboard option and click on Devnagari In script checkbox.
8.  Click on the OK button.
9.  Now in the Text Services and Input Languages, click the Default Input Languages option and click on the selected language e.g. Marathi - Devnagari Inscript option.
10. Click on the Apply button.
11. Now in Language bar, choose the option Docked in Taskbar to display the Language bar on Taskbar of Windows Desktop.
12. Click on the Apply button and Click OK.
13. Now you can type in the indian language by selection the option from the Language bar displayed on the Taskbar.
Open Notepad and Type the text in <body> section by changing the language from the language bar.
While saving the file, select encoding as UNICODE in the Save As dialog box.


Lesson No. 1 Web Publishing - Inserting Sound and Video into Web page

Chapter No. 1 Web Publishing

Inserting Sound and Video into Web page
 
Popular Sound/Audio formats:
 .WAV - developed by Microsoft and IBM. It is the standard format for Windows.
.AIFF - (Audio Interchange File Format) developed by Apple for MAC platform
.Ra - (Real Audio Format) is lower quality audio format (smaller in size)

.MP3MP3 (MPEG-1 Audio Layer-3) is a standard technology and format for compressing a sound sequence into a very small file (about one-twelfth the size of the original file) while preserving the original level of sound quality when it is played. MP3 provides near CD quality audio.
 
.AU -  (Audio)  developed by Sun Microsystems for UNIX platform
.MIDI - (Musical Instrumental Digital Interface)   - format used for instrumental music,  very small in size
.RMF It is a wrapper for audio formats like .wav, .au, .aiff, .mp3 and MIDI. The purpose of the format is to encrypt the data and to store MIDI and sounds together.


Linking to audio file
We can use <a> tag to link an audio resource on your computer or web.
E.g.
<a href="music/background.mp3">
Click here to play
</a>


Adding sound/audio to web pages
<bgsound>
To add background sound to html pages <bgsound> tag is used.
It is supported by only Internet Explorer
It has no control attribute (play, stop, pause buttons)
e.g.
<bgsound  src="music/background.wav" loop=2>
 
Attributes:
Src - specify the name of audio file
Loop - specifies the number of times the file must be played.
E.g.   loop="infinite"   or  loop=-1 
loop=2
 
<embed> tag
It is used to insert audio as well as video both.
It provides console for controlling.
E.g.  <embed src="music/quit.mp3" height=100
Width=200>
 
Attributes of <embed> tag:
Src - Specifies the name of audio or video file.
Autostart - specifies whether audio should start on page load. It has two values true or false.
True value plays music when page is loaded.
False value will play music when user clicks play button.
Hidden - It is to hide the console. True value hides the console.
Volume - Sets the volume of music. Values from 1 to 100 can be set. Default is 50.
Width - specifies the width of the console.
Height - specifies the height of the console.
Controls - specifies console size Values -  console   or small consoles
Value console gives the complete console with play, stop and pause button.
 
Video formats
.AVI (Audio Video Interleave) - format developed by Microsoft for Windows platform.
.WMV (Windows Media video) - developed by Mircosoft
.QT (Quick Time) - format developed by Apple for MAC platform
.MPG / .MPEG  / .MP4 - formats developed  by Moving Picture experts group,  popular format on web.
.flv - developed by Adobe Flash (low quality)


Adding video to the web page
<embed> tag is used to insert video on the web page.
E.g.
<embed  src="videos/sample.mp4" height=480 width=640>
 
Adding video using <img> tag
<img> tag along with DYNSRC attribute is used to insert video in the web page.
E.g.  <img  DYNSRC="videos/sample.mp4"   height=480     width=640>

Lesson No. 1 Web Publishing - Forms

Chapter No. 1 Web Publishing

FORMS

Forms are used to accept or input the data from user. The form consists of objects called form elements or form controls.
E.g. Text box, Password box, Radio button, List box, Command button, submit button, Drop list box, Check box, etc.

To create forms,  <form> tag is used. All the elements are placed within <form>    </form> tags.

<input> tag: Used to create the form fields or controls by using type attribute.


Textbox or Text input field
Used to input text in a single line.
E.g. <input   type=text   name="fname">
Password field
Used to type password (displays * or . )
E.g.   <input  type=password     name="pwd">
Submit button
Creates submit button, used to send form data to server for processing.
E.g.   <input type=submit value="submit">
Example - Simple LOGIN form
<html>
 <head>
<title>Login Form</title>
</head>
<body>
    <h1> User Login</h1>
    User ID: <input  type=text  name="loginid"  size=15>
    <br><br>
    Password: <input  type=password  name="pwd">
    <br><br>
    <input type=submit value="login">
</body>
</html>
Radio button
It's a toggle button and only one option can be selected from a group of radio buttons.
E.g. <input  type=radio  name=gender value="M">
<input  type=radio  name=gender value="F">
Check box
Used to select one or more options from number of choices
E.g. <input   type=checkbox   name=hobby  value="Cri">
<input  type=checkbox   name=hobby  value="Bas">
Button field
It is used to display a command button to which we can assign a function (task).
Clicking the button will activate a function.
 E.g.  <input type=button name=button1 onclick="function();">
Attributes of <input> tag:
Name  - assigns a name to form field.
Size - specifies the display size of a text box
Maxlength - limits the number of character that a user can enter in a text field.
Value  - It is used to assign a default value to text box.
Type - It indicates the type of form objects like text (default),  radio, submit, reset, checkbox, etc.
Checked - It is used to specify default selection for radio button and check box.
id - used to provide a id to the field (used in CSS)

Select list box  or Drop down list box
The <select> tag is used to select an option from menu kind of drop-down list or scrolling list box.
E.g.
<select  name=city>
<option value=mum>Mumbai</option>
<option value=thn>Thane</option>
<option value=kyn>Kalyan</option>
</select>
Attributes of <select>:
Name - It is used to specify a name to the select box. Assigns a label to selection.
Size - Specifies the number of list items to be displayed at one time.
Multiple - Allows the user to select multiple options.
  
<textarea> tag
It is used to create multiline textbox or large editable area.
E.g.
<textarea rows=3 cols=40>
  
</textarea>
Attributes of <textarea> tag:
Name  - assigns a name to the text area
Rows - specifies the height of the text area in  number of lines.
Cols  - specifies the width of the text area in no. of columns /characters.
Hidden field
The purpose of the hidden field is to store the value that need to be sent to server along with form. The browser does not display these values.
E.g.  <input type=hidden name=xyz  value=256>
Attributes of <form> tag:
Method   -   It specifies the method of sending form data to the server.
There are two methods:
GET - It appends the data to the URL in name/value pairs.
POST - sends the form data hidden in HTTP headers not visible on the screen.
Action - It specifies the location/path or URL of the server where the form data is to be submitted.
Name - assigns a name to the form.
E.g.
<form  method=post  name=form1 action="http://www.exza.in/getdata.php">

Lesson No. 1 Web Publishing - Image Mapping

Lesson No. 1 Web Publishing

IMAGE MAPPING

It is a single graphic image that consists of number of hyperlinks incorporated within an image.
The specific areas mapped within an image are known as hotspots which are links to a resource.
Map is a text file that contains the information of an image and the mapped areas of an image.
These areas can be rectangles, circles or polygons defined in an image specified by coordinates in pixels of the image.
There are two ways to do image mapping
1) Client Side mapping   -  They are executed on client machine from web browser itself. All information is loaded along with the image. It executes quickly.
2) Server side mapping    - In this the program that executes the links is placed on the server. The browser activates program on the server by sending x and y coordinates of the position where hyperlink was created.

Client Side mapping
In Client side mapping, the image map is mentioned by using USEMAP attribute in the <img> tag. The map is specified in the <map> and <area> tags, which defines the hotspot in an image.
For specifying the areas of the hotspot, the <area> tag is used within <map> tag.


The attributes for <area> tag are as follows:
shape :- specifies as values rect, circle and poly
 rect  -  for defining rectangle area, upper left and right bottom (X,Y) coordinates.
 
 circle -  for defining circle area, coordinates of center point and radius is specified.
 poly -  for defining polygon area, 3 or  more pair of coordinated to form polygon 

coords :- specifies coordinates for rectangle, circle and polygon
href :- specifies path of html file or URL of website.
alt :- specifies alternate text given to hotspot


E.g. Client side image mapping
mapexample.html
<html>
<body>
    <img src="images/globe.jpg" usemap="#test">
   
    <map name="test">
            <area shape="rect" coords="22,37,123,97" href="page1.html">
            <area shape="circle" coords="406,38,30" href="page2.html">
            <area shape="poly" coords="48,169,142,234,50,248" href="page3.html">
    </map>
</body>
</html>

The coordinates for the shape are found by opening the globe.jpg picture in Paint by placing the arrow over the points and note down the coordinates.


Server Side mapping
In Server side mapping the map details are placed  on the server. The browser activates program on the server by sending x and y coordinates of the position where the hyperlink was created. On receiving the coordinates the program on the server looks at the map file for close match and then loads the file that is closet to coordinates.

In Server side mapping, the image map is mentioned by using ISMAP attribute in the <img> tag.

The map details are save in a text file with the extension .map and place this file in the same folder in which html document containing the image is placed.

E.g.  Server side image mapping  - the map is written in globe.map file which is placed on server

globe.map

    Default http://exza.in/xyz.html
    Rect  http://exza.in/page1.html   22,37,123,97
    Circle  http://exza.in/page2.html  286, 90, 45
    Poly   http://exza.in/page3.html   48,169,142,234,50,248


mapexample.html
<html>
<body>
    <a href="http://exza,in/globe.map> <img src="images/globe.jpg" ISMAP> </a>
       
</body>
</html>

The href attribute of <a> tag specifies the location of external map file and server side image map program on the web server. The <img> tag is reference for the mapped file. The ISMAP attribute in the <img> tag specifies that the image is mapped file. ISMAP indicates a server side image map.